Okay
nearly, but the total structure is FINISHED, and all that's left to do is make cushions. So, so exciting - It looks like it was always meant to be there! Couldn't have wished for a more perfect outcome, and all thanks to my Dad's amazing carpentry skills and patience.
Ready to get inundated with pics? Here we go...
 |
| Tucker supervises as the last piece goes in. |
 |
| Adding trim |
 |
| Good thing those dogs are around to make sure we're on the right track. |
 |
| Strength Testing Committee |
 |
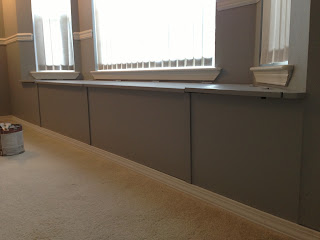
| Trim finished and ready for filler and paint! |
 |
| Pre-finishing touches |
 |
| Next up: Wood filler |
 |
| And some plaster to smooth out corners. |
 |
| So scary to do this part...!! |
 |
| Gotta get ugly before it gets good.... I hope... |
 |
| Now the pretty begins - Paint going on! |
 |
| Vertical trim pieces to cover bench-segment seams. |
 |
| Could it be...?? It's DONE! |
 |
| Magic! |
 |
| And look at those corner seams - Gone! |
And just to save you from carpal tunnel, a little [way] before and after snapshot:
I can't believe it's really finished... Seems almost like magic that something I saw in my mind's eye pretty much from our first viewing of the house with our realtor has come to such (
freaking awesome) fruition.
Shall we review the list once again?
*
Build & Prime
*
Paint
*
Rip out carpet underneath structure (and eventually put in flooring - can't WAIT for that)
*
Remove baseboard trim from wall and place on bottom of bench (we went with new in the end)
*
Fill holes and touch-up paint
*
Adhere vertical decorative (and seam-hiding) trim to body of bench
*
Adhere trim to front lip of seat cover
*Make cushions
Only one item left, and that's all on me.... So you can bet that will take a minute or two to get done. But y'all will be the first to see the results! I'll keep you posted.


