9.28.2012

Quick Craft: Autumn Door Decor

Living in a neighborhood that decorates for holidays and a talk with a friend who loves all things autumnal got me itching to fall-ify our house a little bit. One trip to Michael's floral section and I was in business.

I saw a bunch of pre-made decor on their shelves, but it ranged from about $20-$40. Considering they were having a sale on the Ashland brand fall foliage (50% off) and the fact that I actually like to make things, there was no way that I was willing to shell out that kind o' cash. Four bunches of harvest-y vegetation on sale only set me back about $12.
Once home, I snipped all the stems apart using small wire cutters. Then, using just basic masking tape to hold my place, I began layering.
Snipped Apart. Apologies for the blur - Too excited to start my project!
Once things were as I wanted them and my final wrapping of masking tape had been secured, I twisted a doubled strand of wire around to create a hanging loop, and then wrapped the taped and wired center in a maroon ribbon I had in my gift wrap storage.
On the door it goes, and I'm loving it. I even had some straggling bits of flora left over, so they now are in a julep cup making the interior of the house a little more festive. $12 and two decorations? I'll take it.

9.27.2012

Quick Craft: DIY Team Logo Gear

I married into a family who are massive University of Washington fans. No, none of them went to school there, but if you care about collegiate athletics - especially football - liking the Huskies is just something you do on this side of the Cascades.
image
Years (and years) of season tickets and general fan-demonium have stuffed the hubs' closet to the brim with Udub paraphernalia, and I'm coming up right behind him. But what to do when you go to, say, one game a year and don't feel like shelling out $30+ for a t-shirt with a W on it? With my parents coming up to attend a game with us this week, that question begged to be answered.

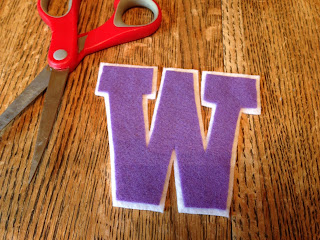
Enter (trumpets!): How to DIY your own logo gear with felt.
Most logos are pretty easy to re-create by looking at a picture and having a ruler handy (that was my approach), but a more complex outline could be easily managed by searching Google Images and printing/cutting out a paper pattern to trace onto your felt. If you're computer savvy, you could even size the logo differently before printing and snipping to accommodate your needs.
I should have done it on paper, but this is what I used as my pattern.
I just tacked my layers together with a thin bit of glue, but a contrasting whip stitch around the edges would be adorable if you have the time.
I'll be stitching pin-backs on these guys so they can be taken off and on whatever hat/shirt/jacket they land on, but a more permanent solution would be to adhere them to your surface with stitching. With felt costing 30 cents or less a sheet, this is about the cheapest logo gear you could possibly hope for. Support your team in style and on the cheap!
Just enhancing the real world application with the dog hair-coated jacket. You're welcome.

9.25.2012

Quick Craft: Studded iPhone Case

Since I already mentioned my inspiration for this project here, I'll launch right into the results... And man am I delighted with those!

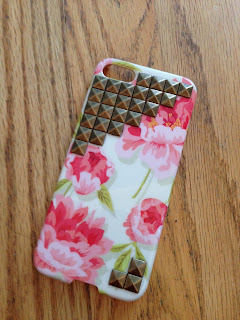
As you recall, I started by ordering some iron-on studs, and I picked up a hard case at Best Buy on Friday when all the iPhone 5 stuff was available for purchase. I was expecting to get a case in a solid color, but was stoked to find a few patterned options to choose from as well. I landed on a floral version by Agent 18 that has a quality that always appeals to me: It looks like a fabric print.
I know what you're thinking - I'm not really a pink flower kind of girl. You're right. But what better to counterbalance fluffy pink peonies than some bronze pyramid studs?
Salty and sweet, my favorite combo. Many thanks again to Julie Ann Art for the inspo!

9.24.2012

Random Round Up: Black & Blue (& Purple Too)

It was a color-themed weekend, complete with fall fruits and a shoulder surgery for my mother-in-law.
Wild blackberries are starting to appear.
My struggle with stress fractures/deep bruises on my heels continues. Lots of ice!
Harvest from our backyard plum tree.
Snips from my mother-in-law's garden to help in her healing process.
A few extra posts to come this week with three craft projects completed and ready for show-n-tell! Happy Monday all.

9.21.2012

Wedding Photo Canvas

A while back I stumbled upon a discount offer through the Today show's "Steals and Deals" segment for a company called MyPix2Canvas.com. I've always loved stretched canvas art, and the idea of using one of my own photographs - what this company specializes in - was pretty appealing for the price tag (...$25 I think? Somewhere thereabouts).
I snapped up the coupon and then proceeded to let it sit neglected in my email inbox for months.

Glad I did, because what better to use than one of our amazing wedding photos from Dana Pleasant Photography?! The images we received from Dana are incredibly high quality, which made it a simple upload process to get the 20x30 canvas ordered and on it's way.
I'm so impressed with the results - Beautiful color, a seemingly durable (aka: gently dust-able) surface, and incredibly sharp picture quality.
Even the tiny details are sharp on this canvas.
 On top of it all, they sent me a coupon good for 30% off all my orders for the next year and hardware to hang the canvas with. This big guy (it comes up to my upper thigh) is headed for the master bedroom, but with a coupon handy and such amazing results, you just may be hearing about an order from this company again in the near future.

9.19.2012

iPlans

Let's just get one thing out of the way right off the bat: I live with a through and through Apple FanBoy.
Luckily we haven't come to this quite yet.
We have a more-than-we-need array of iProducts (clearly that's only my opinion), and I've been completely turned to the Apple side in the Apple vs PC battle. That said, guess who has the new iPhone 5 zipping it's way to them right now? Sigh.

Alright, I am a little excited to upgrade. And having a planned craft project helps - I just ordered the studs to make this guy (thanks to the idea/tutorial from JulieAnnArt):
Ignore the cartoon hand in there - I took a pic of my computer screen :)
I can't wait to pick up a case when they are available for purchase and get to gluin' (hopefully this weekend)!

P.S. I'll be using E6000 glue and these studs (10% off through the end of September).

9.17.2012

Random Round Up: Indian Summer

We're having kind of an amazing week of Indian Summer around here, and I'm loving every sunny, crispy second (although with a high of 80 today, not so crisp and autumnal as I would like). Delicious!
The cleanest, bluest skies.
Pumpkin Spice or Bust!
Husky Home Games
Sweet gifts from Nate's parents' time in New Orleans
It's all in the way you look at it, right?

9.14.2012

Seeing Gray

Nope, it's not quite time yet for the northwestern skies to take on their signature shade, but I am seeing gray nonetheless.

The window seat is painted! Take a look:
Unpainted and un-cushioned, Tuck still enjoyed the new vantage point.
Primed and in pieces
Let the painting begin!
Behr Premium in Sparrow going on
I carefully went around all the hardware....
...only to decide it was just too gold. A light coat on the hinges fixed it right up!
Two hours and two coats later.
 Now before you see the pieces put back in their places, please remember the following list of window seat to-do's:
*Build & Prime
*Paint
*Rip out carpet underneath structure (and eventually put in flooring - can't WAIT for that)
*Remove baseboard trim from wall and place on bottom of bench
*Adhere vertical decorative (and seam-hiding) trim to body of bench
*Adhere trip to front lip of seat cover
*Make cushions

...So, we've a long way to go yet. But any progress is reason to celebrate. Can I get a woohoo for the pics below?
 Of course the lighting is - as always - not great since it's just too handy to use my iPhone's camera, but just by painting it the whole thing looks so much more intentional and, well, built in. Coming together!

Edit: This is the 200th post on this blog... Crazy!

9.12.2012

Quick Craft: Lace-Embellished Tee

So item procurement might not be the quickest, but once you've got your pieces this lil' project will take you about 10-30 minutes depending on how fast a hand sewer you are.

Needs:
*T-Shirt
*Lace
*Needle & lace-matching thread
*Fray-Check (to keep lace ends from fraying if you need to cut it)

Lace is so trendy right now, and believe it or not, you can almost always find the stuff at your local thrift store. What's more, it's often of much higher quality for a WAY better price then you would ever find at your fave fabric spot. Hit the thrift store's fabric section, or look into the tablecloth/home goods area for doilies or large pieces you can cut up (if you come up empty handed, a Google search of the term 'lace applique' should also get you headed in the right direction).

I ordered this swingy tee online during Forever21.com's BOGO sale recently... So it was free! Score.

image - Forever21.com
Then, using the scrap of lace, tacked it down (i.e. stitch through with thread doubled, tie knot, snip and move on) wherever it felt loose. In this case: A few at the top, the sides and bottom, as well as one in the center for good measure. All you're doing is making sure it doesn't flop away from the shirt when you move, and that it can't easily catch on anything.
It's so much more interesting now, and since the tee is pretty low-quality (but hey, free!), I can always easily snip my stitches when the shirt has run it's course and use the lace on something new.

Presto, change-o!


9.10.2012

Random Round Up: Waterfall Surprise

I'll start with the normal weekend happenings, and leave you in suspense till the end for the soggy story...
Spontaneous local date night Friday.
Hooray for friends and fam with gardens!
Obsessed with these amazing 10 minute manicures.
Finally getting paint on the window seat pieces!
And then came a visit to Nate's parents house while they were out of town... I heard a rushing water sound in the house, and Nate saw an inordinate amount of water gushing out of a pipe on the street (you can tell already this is headed nowhere good, huh...). Long story short, broken pipe attaching the sprinkler system to the house, waterfall outside, waterfall in the crawl space under the house, lots of emergent action and phone calls to the parents to get emergency shut-off valve directions and then - thankfully - to let them know all was well. Could have been a LOT worse - Best of all, we think we discovered it only a few  hours after it happened. Phew!!
Emerging from the ankle-deep-in-water crawlspace, Dad in hand...
Busted - Pipe on the right, other half of pipe (green) on left...
Nate went wading....
 So other than us having some seriously soggy feet (and ankles, in Nate's case) and the uncertainty of when the next shower will be for Nate's parents.... It's all good. :) Happy Monday all!

9.06.2012

Paint By Numbers


Consider what we did the Botox of the house-face world. No major surgery, just some minor pain and general maintenance.

The objective: Replace old ugly house numbers, strip/sand/caulk exterior garage area, color-match exterior house paint and touch up.

Result: Yay! Check it out - Amazing what a little sweat equity will do over the course of a couple days.

 And it only got worse before it got better with number removing, scraping, caulking, and sanding up a storm:
Ready for the results? Ta da:
And just to save you some scrolling, we went from janky to chic with those numbers in nothing flat:
We worked on the project both Sunday and Monday, but only a few hours at a time, leaving us lots of time for having some fun and relaxation. Pretty much a perfect high-impact (to us, anyway) weekend project with a low-impact on precious weekend fun time. Totally worth laboring through Labor Day!