Showing posts with label supplies. Show all posts

1.03.2014

Top 5 of 2013

First: Thank you!
Yep, you. The one reading this right now. Thanks for reading this - and numerous other ramblings - over the past 12 months. Feel free to be liberal with the back patting, you deserve it!

I thought it would be fun to take a glance backwards before we dive headlong into 2014, so here are my five posts from twenty-thirteen that garnered the most traffic. The posts that Y-O-U chose as the best!

I never know quite what will ring people's bells, but perhaps it's the what-to-buy list in this post. I must say, every product and technique used in this guy will be used a great deal more in the new year!

Yep, this one I get. Because the plum cake recipe included in this post is the bomb dot com.

Stop, I'm blushing. My Crowdtap blog shoutout landed the #3 most popular post of the year.

Warm my heart, why don't you! Any time my attempts to raise money for Type 1 Diabetes research garner attention I couldn't be happier. Here's hoping you all donated at Walgreens and - shameless plug - are about to hit up www2.jdrf.org right now to donate to Team Ella of Minnesota.

#5: Ottoman Reupholstering: Bottom and Lid/Results
Such a fun, easy, and totally transformative project. My 'new' ottoman is still happily installed in our family room collecting compliments and loving gazes.

Can't wait to see what you all choose to be the most popular of 2014!


3.06.2013

Make It: Gorman-Inspired Print Hoodie

There's little I love more in my wardrobe than a good hoodie. Zip-up or pullover, lightweight or thick, they all have a use and a place in my heart. So when I saw an amazing triangle-print crew neck floating around Pinterest recently by the Australian brand Gorman, I drooled, I ogled, and I found out it was not only no longer made, but about $150 originally anyway.

Nope.
But it got my wheels turning, and inspiration struck: Sponges. One shopping trip later (Target and Michael's), and I was home with everything I needed.
I played around with paper first, figuring out how large I wanted my triangles to be, then simply traced the pattern onto a sponge, and sliced with a ruler and an X-acto knife. Stamps: Created.
Queued up the Project Runway and Fashion Police on dvr, stuffed my hoodie with an old torn apart shoebox, and away I went.
painter's palette = plate covered w/foil
Slip cardboard inside to protect from paint seepage!
Due to dry time (about an hour+), I ended up finishing the next day in a few spurts: Each side, then the back. My protective cardboard inserts collected any paint seepage, and those were dry by that time too so I could re-use them as I flipped the shirt around from section to section.
Just when I thought I was ready to show off my creation to the world, I realized just how ugly the inside of that hood looked from the paint seeping through. Ack! But easily fixed: A scrap of soft gray waffle knit in my remnant pile was pinned in place, and a couple runs of the sewing machine* was all it took to be problem solved.
The finished product was official:
The Gorman version is oh-so-much chicer and more beautiful in every way (which is as it should be for the price), but I'm pretty stoked with my results. A cozy hoodie that I can throw on and look like I tried - at least a little bit - is what I was going for, and I think I got exactly that. DIY success!
Cost breakdown:
Hoodie: Target men's department, on sale, $8.49 (orginally $12)
Paints: Michael's, $1.99 each ($8 total)
Sponges: Target, pack of 4 for $1.75-ish (and I only used one)
Total Cost: About $18


*I'm happy to break down this hood lining process further if anyone's ever interested. I developed it myself, and it's quite easy and can really change the look of a basic hoodie. I've done it a lot - No pattern-making skills required! Let me know.

3.22.2012

The Sea of Tissue

The title is true : At this point I could almost add a geographical sea of tissue to the map of where I live.

I said it was all about volume, and indeed it is. I'm racking up the tissue/tulle/lace flowers like my life depends on it. While I'd love to say the end is in sight, it's kind of a 'the more the merrier' deal, so the end just may come when my options are A) I'm going to scream, or B) I need to sit still so I can get my makeup done the day of the wedding.

Hopefully neither.

But probably both.
The staging area...
...the results, stuffed into their bottles and ready for tables.

3.19.2012

Pretty Pretty Parasols

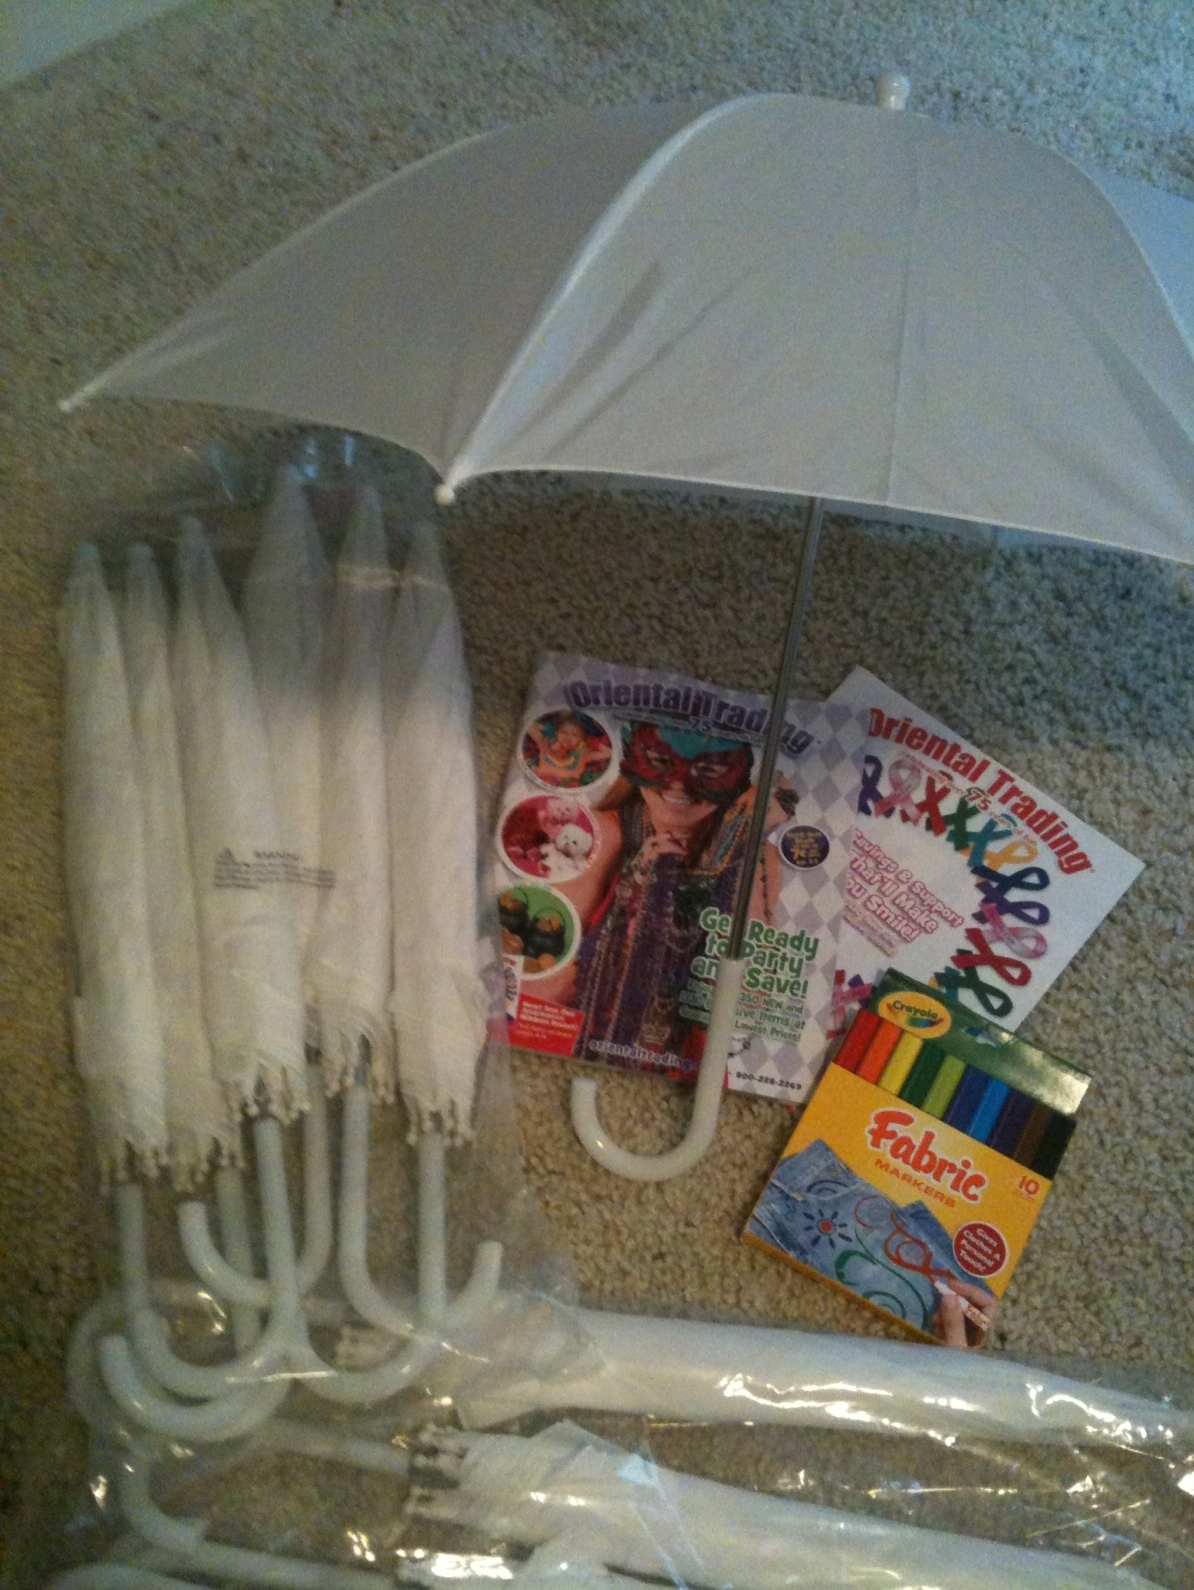
Remember the child-sized-umbrellas-turned-parasols from last week? A couple fabric pens and some pom pom trim and voila, cute wedding parasols!
Trim ordered on eBay from China
Fabric Markers and Glue Gun Fun
Ironically, I had to wait for a break in the rain (and snow, what?!) to take pics of these guys on the deck. The one with the white pom poms is mine, and the rest for the wedding party are all a teensy bit different from one another. I'm free handing it, so whatever comes out of my brain at the moment is what they're covered with.

At this point I kind of think they're cute enough to make it into a couple bridal party photos even if it's by some miracle not raining on The Day.

3.15.2012

Flower Power

At this point it's all about volume.

Since I'm not using real flowers, that means kickin' it into overdrive on the tissue/tulle/lace bloom creation. Nate's been helping with the prep work, which makes the assembly process go much faster. Thank goodness!
So that's what I've been trying to crank through nightly - at least 10-12 per weeknight should get me about where we need to be to create a lovely, full tablescape.

3.12.2012

Under My Umberella-ella-ella

My photographer Dana reminded me of something important the other day : Make a plan for rain.

It is Washington, after all, and if there's anything you can depend on, it's some form of precipitation falling from the sky. Usually when you want it to happen the least.
What I really wanted was to purchase parasols for everyone from Bella Umbrella, a dreamy buy-or-rent local business that pedals gorgeous, fanciful umbrellas. But at $40+ a pop, it just wasn't in the cards.
 Bella Umbrella Parasol
Enter Oriental Trading. I grew up pouring over these catalogs as a kid - My primary school teaching mother would get them to order things for her classrooms. They specialize in bulk orders, thus making it easy for me to pick up a dozen umbrellas in one fell swoop.
These umbrellas happen to be meant for kids, meaning they're the perfect parasol size I was hoping for. Not to mention they're meant to be painted/stamped/decorated, so ordering a set of fabric markers to embellish in our blue palette seemed pretty perfect.

Now all we can do is hope we don't have to use 'em.

3.05.2012

Flying The Flag

Sorry for the radio silence over the weekend, but it offered me a much-needed opportunity to crack down and knock out a few projects that have been hanging over my head.
Not to mention a little down-time too, which was probably more of a mental necessity then craft project completion . Props to Nate for convincing me to stop, sit, and be lazy for a few minutes!

I'm not sure if I've mentioned, but the thought of crafting more felt flowers for my flower girls became an overwhelming thought a while back - I couldn't figure out how they would carry them, or if they threw petals, who I would assign to clean them up (we're on the hook for anything 'littered about' the building/grounds at our venue) . Enter : Flags
I've seen them dotting wedding photography all year, and in a clouds-breaking-light-shining-down moment, I decided not only were they just the thing, but I could make my own rather than ordering them from a vendor.

Remember the pack of stencils and the poster board from the Michael's supplies photo? The thick paper lent itself perfectly to a double-weight pennant, and the stencils were put to use on some scrapbooking paper I already had, the letters the cut out and adhered. The stack of ribbons and dowels from that photo were put to use too : Ribbon wrapping the halved dowel and dangling from the top of the pennant, the dowel acting as a hand-hold.

Now of course I'm worried that my lil' flower girlies will be disappointed in the fact that they don't have flowers to hold or petals to toss, but hopefully some sparkly ribbon and some handmade flowers pinned to their dress sashes will suffice.

3.02.2012

Sittin' On Top Of The World

... Actually, sittin' on top of the doughnut cake.

Same thing, really.

I'm telling you, this week has worked me over, and these blog entry titles are living proof! Anyway, we've already covered what happened to the ball of string in the photo of the latest haul from Michael's craft store, so now we're on to that random wooden "J".

Cake topper! I'll attach two wooden 'spears' to the base, and that's what will stick into the top of the cake to support the letter. Easy and cute. Count it.
Don't know why these pictures are loading sideways, and quite honestly I don't have the patience to fix it today. You know it's a J.

It's painted in that same 'Lagoon' that I covered the cake stand bases with, so that whole doughnut situation will be a coordination station.

Wow . I need to be done . Happy weekend!

2.26.2012

White Wash

Talk about a bottle neck.

Those bad boys are still hanging around, more voluminous in number than ever before. Now that there's a garage in the mix, however, they're able to be painted and dried in bulk.
I took down about 10 tables worth one morning last week (wonky work schedule had me starting the business day at 1:30pm - YUCK), and here's the [almost] results :


I kind of love how ugly and hodge-podge they are in the beginning, and what a stellar kind of unified, 'shabby chic' vibe they throw off post-paint.

And see the "FLAT" finish description on that can? That, my friends, is the key. By going flat instead of any sort of sheen, they end up looking more like actual fired porcelain, rather than the high-gloss glass that they actually are. They're still wet in the photos above, but once dry : Glare-B-Gone! Gloss and shine just don't jive with the tissue/tulle/..... homemade thing I've got going here, so flat is just what the doctor craft gods ordered.

2.25.2012

100th Post : Cake Plates

And the award for the most unoriginal title goes toooo............!

But yes, it's taken months to get around to finishing a 20 minute job, but the cake plates are done and ready for their big doughnut debut.
The Ingredients

Glued

Ready For Action

The Option for Tiered Stand

Instagr.am Shot . . . Why Not

The Goblet Base, "Right Side" Up
Seriously one of the easiest projects ever - Perfect for any occasion, and for just a couple bucks to make one, I'm going to have to highly recommend it for all of you out there in BlogLand. Easy! Do it! Go!

P.S. My parents are up today, and it's the FIRST TIME my Mom has seen the house since about 3 weeks before we moved in. So today we're celebrating my Dad's birthday and tackling putting up some pretty white trim in my navy blue pet of a powder room. Surely pics to come! 

2.24.2012

Details, Details

I feel like I know what you're thinking already... MORE craft supplies? MORE? Really?!

Yes.

Really.

The haul from Michael's :
 
Stencils, string, ribbons, glue, poster board... To become all manner of things (we'll divide it up later as I conquer projects).


 And the wedding-related goods from the afore-mentioned trip to Ikea :
Not one of the above items was on the To-Buy-At-Ikea list, much to Nate's chagrin, but it was such a score to find our center unity candle (under $5 instead of the going rate of $30 at craft supply places), as well as the holders for our unity candle... lighter candles (do those have a title? whatever.), and - who knew - navy blue cocktail napkins to be used with the doughnuts at the reception.

Now I get to check a few things off the list and dive into more! ...Yay...?

2.15.2012

Let Them Eat Cake

...Er, doughnuts as the case may be. But either way, dessert needs a perch.

Remember the supplies I picked up at Goodwill for cake plate making? Well, the time has come. A little newspaper coverage of the garage* and a can of Rust-Oleum in 'Lagoon' and the process was underway.
Next up is a little glue action, affixing the gold and silver chargers to the once-bottom-now-top of the goblets. Another project well on it's way to completion, woohoo! 

*A moment to celebrate the fact that I now have a garage, please!

2.08.2012

Felt Flower Fiesta: Bridal Bouquet

Just when you thought you'd never see a "Felt Flower Fiesta" post again...

You know you missed it. I'll let the pictures do the talkin', but my bridal bouquet is done! Check that suckah off the list. Wooot!
2 36" dowels cut in thirds, glued together, and stuck in 6" foam ball

Dowel Close-Up

Starting In...

Felt Flower Fountain

Time to cut some lace for the 'stems'

Almost done - Rhinestones in place!

close-up of some teeny rhinestone detail

Maternal Grandma's brooch, Paternal Grandma's bracelet

Finished Product
I'm super happy with how it turned out - Happily more projects are coming out as they look in my head then I ever could have hoped for on these wedding crafts. Can't wait to carry this guy down the aisle and have it to look at (sans-jewelry) for years to come.